
Included on this page you will find:
1. Hand print letter of the week images & directions
2. Decorating a letter (with an object) images & directions
3. A video for the formation of the letters when writing
Please visit all three areas for a complete letter of the week vision!
I have 2 different projects that go along with our letter of the week. I am collecting them through the year and when they are done, making a cute little alphabet book for them and their parents. Their parents will cherish this one because it shows their hand size at this cute little age!
The pages for my Letter of the week book (for the handprint letters and the decorate a letter-with labels) is available on my TpT site. To save yourself some time, please download this source!
Decorating a Letter
I created a set of bubble letters in Word Art. I then have
the students use a variety of mediums to decorate the letter based on the
letters sound or shape.
A = Apples and Ants. I printed out clip art ants and apples and the
students glued them on the bubble letter shape.

B = Blue Bubbles. I mixed blue liquid temepera paint (also
can find as liquid water color) and some dish soap. I put the liquid
combo in a 9 oz dixie cup. I blew bubbles (slowly) with a straw. I
normally let the students blow their own bubbles, but I only had one straw
(forgot to buy a pack but found a fastfood one in the break room). I
blew the bubbles and had students "stamp" their paper on the bubbles.
They told me when they were done or if they needed more bubbles. The 9 oz
cup works great. It is a great size and not a lot of liquid left over;
easy to get bubbles to go high enough.

C = Cotton ball Clouds. Students used the phrase, "dot dot
does a lot" as they dotted down their Cc with glue. They then used
their fine motor skills to pull off tiny pieces of cotton ball to make clouds.

D = Dots. Students used bingo dot markers to dot along the
letter Dd. They chanted, "duh, duh, dot the D"

E = Elbow to look like Eggs. Students got their
elbows painted in yellow and then stamped them on the E. They looked like
scrambled eggs! (We washed their elbows off with a baby wipe). They
loved it and I think it will really help the sound of E stick with them!

F = Feathers. Students glued assorted colored feathers to the
letter Ff.

G = Green and Gold Glitter. Students put glue on the letter Gg. I
told them they could put the glue however they wanted, but it had to stay in
the Gg. However they put the glue, that would be how their glitter would
show up. They then brought it to the Green and Gold Glitter table. They
got to choose how they wanted to do the Green and Gold. I shook it on,
they shook it off.

H = Hearts. Paper, foam, and colored on hearts. Two weeks
before Valentine's day it worked out :)

I = Ice. I froze some liquid water colors in 5oz dixie cups.
Stuck a popsicle/craft stick in and froze. Took them out about 10
mins before the activity and let the students paint with ice. They loved
it!

J = JELL-O. I mixed jello mix with water and let them paint with
it! It went well, but make sure not to let it get too wet (soak through)
or it will stick to drying paper and need to be redone. If you do let it sit
and actually gelatize, it does not stick to the drying rack/paper and does much
better. This is my afternoon sample, this student basically painted with
real jello!

K = K'nex. I used the Knex toys and students stamped with
them.

L = Lines. Students draw lines in any direction the choose
on the L.

M = Mini Marshmallows. Students were given mini marshmallows and glued them all over their letter Mm
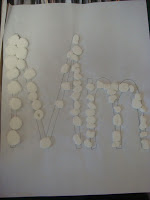
N = Noodles. Students glued noodles on the letter N. I encouraged the
students to say NNNNNNNNNoooooodles. As they did it.

O = Orange
"O's" roooooolled Over.
I used orange large beads, dipped them in orange paint. I put the paper
at the bottom of a box and dropped the "orange O's" in.
Students rolled the box until it was all oooover the O

P = Popcorn.
I popped a bag of popcorn and had students dip it in the yellow paint and
"pop" it across their letter Pp

Q = Quilt Pieces. Students cut up and glued on quilting
pieces (fabric) to make a quilted Q.

R = Ribbon Pieces. I cut an assortment of ribbon pieces and gave children the opportunity to put the glue on and then put the ribbon pieces on.

S = Star and Smile Stickers. Students chose star and smiley face stickers and placed them along the bubble letter Ss

T = Tear Tiny Tiles. Students tear scrap construction paper
into "teeny tiny" pieces and glue onto the T.

U = Umbrella. I purchased the mini umbrellas you put in your drinks. I opened them up and students stamped with the side of the umbrellas. Plan on an umbrella only lasting 1-3 students so make sure you have enough! Good thing I purchased a 20 pack!

V = Vehicles, Vroom Vroom! Students drove their cars VROOM VROOM up
and down the V.

W = Watercolors. I taught the students the proper ways to use watercolor in the class, and then students watercolor painted the letter W.

X = X-ray. Students first painted the X black and then glued
bones (Q-Tips) for an X-ray.

Y = Yellow Yarn. Students wrote the Y with glue and then stuck
yellow yarn in the glue. I used Yellow paper for more reinforcement.

Z
Hand Print Letter
I create a hand print image for each letter of the alphabet.
We discuss why we chose the picture we did and review the sound of the
letter and see how the "match" from letter to front of the word.
A is for Alligator. Paint the left hand green. Stamp on top at a slight angle. Paint the right hand green avoiding the thumb. stamp so palms touch and down at a slight angle. Draw on an eye on the top thumb. Draw teeth in the v of the mouth.

B is for Bumble Bee. I painted the hand in stripes of yellow and black. Make sure to paint the butt of the hand area black first....to be the head. Keeping the fingers and thumb tucked in as close as possible, stamp hand with fingers parallel with the words (pointing a the side of the paper). When dry, draw on antennae and wings.

C is for Cat. Paint the hand brown. Keep fingers
pointing to the bottom of the page (away from any text you have on the top).
Paint a tail on the palm of hand. Thumb is the neck and head.
With a marker, drawn on ears and face.

D is for Duck. Paint the left hand yellow. Stamp the
hand, fingers together, horizontally--parallel to the bottom of the page.
Paint a yellow neck and oval head. Paint a small orange beak on the
duck. Draw an eye on with a dot of the marker.

E is for Elephant. Paint the hand gray. Spread the fingers wide and have fingers point to the bottom of the page. Thumb is the trunk, I drew faint lines on it with a pen. I then drew an eye, a smile, and an ear with pen as well. Three lines on the feet were done with pen as well. I finished with a gray tail made with crayon.

F is for Flamingo. I painted the hand pink. I had then spread their fingers and point them parallel to the words, thumb down. I used the thumb as part of the bent leg. I painted the bottom of the bent leg and then straight leg. I painted on a long neck and a the head. I drew the beak and eye on with marker. I then put water on with marker.

G is for Ghost. Paint the hand white. I used a colored
page so this would show up. Stamp the hand with the fingers facing the
bottom of the page. Draw on 2 eyes and an open mouth with marker.

H is for Hippo. I painted the whole hand gray. I
had the students stamp the whole hand fingers spread wide. I made sure to
roll the thumb to make the head as fat as possible. I then painted on a
little tail. When dried, I used a extra fine sharpie and drew the ends on
the tail, two front teeth, eyes, and ears.

I is for Ice cream. Paint the right palm brown. Keep fingers
pointed to the bottom of the page (away from any text you have on the top)
and TOGETHER, make the cone. Paint the left hand the color of ice cream
you choose. Keep fingers pointed to the bottom of the page
(away from any text you have on the top) and spread wide to have the ice cream
drip over the cone.

J is for Jaguar. I painted the hand yellow. I then painted brown dots on the hand in various places. I then stamped the hand, fingers point to the bottom of the page and spread apart. I painted the tail and ears with the yellow paint. When dry, I drew on eyes, inside the ears, whiskers, a nose and mouth with brown marker.

K is for Kite. I painted both of their hands. Students stamped the first hand, then the second with the fingers touching the first. I flipped the paper over and did the same thing. I then took a second color and painted the sticks in the middle. I colored a string with marker and marker bows on the bottom.

L is for Lion. Paint the hand yellow. Keep fingers
pointing to the bottom of the page (away from any text you have on the top).
Paint a little tail on the palm of hand. Thumb is the neck.
Paint a circle at tip of the thumb for a head and brush strokes away from
head for a mane. I dont put any more paint on my brush after head to give
hair a more hair like look. Color face on with a marker.

M is for Monkey. I panted the entire hand brown. I printed
the hand with thumb pointing parallel with the words and fingers away from the
text (towards the bottom). I then painted their thumb and had them make
the head at the tip of the already printed thumb. I painted on a tail and
let dry. I colored the eyes and face on with a marker.

N is for Necklace. I drew a string for their necklace on their paper in front of them. I then told them to put the beads on the necklace with their thumb. I let them choose the color and I painted their thumb. (They had to ask, "May I have more paint please" each time...working on those manners!)

O is for Octopus. Paint the hand orange avoiding the thumb. Keep fingers pointing to the bottom of the page (away from any text you have on the top). Repaint the hand again and stamp right next to it. With a marker, drawn on eyes

P is for Penguin. I painted the thumb, pointer finger,
pinky, and rounded part of the hand by the wrist with black paint. I then
stamped the hand, fingers pointing to the bottom of the page and close
together. I drew on feet and a beak with orange marker, and then two
small black eyes with a black marker.

Q is for Quilt. I let the students dip their fingers in the paint color of their choice. They then put the colored prints together to make a quilt.

R is for Rabbit. I painted the ring finger and pointer finger as well as the palm of the studnent's hand. I then had them stamp their hand with fingers slightly spread towards the words (top). When it dried, I put the eyes, nose, and teeth on with a marker.

S is for Spider. Paint the hand black not painting the thumb. Spread fingers wide and have fingers point out to the sides. Paint hand black again, overlapping palms of hand, have fingers point the other way and stamp down. I used white out for the eyes and then when that dried, a dot with marker. I drew a web as well.

T is for Turtle. Paint the palm brown, fingers and thumb green.
Keep fingers pointed to the bottom of the page (away from any text
you have on the top). Paint a little tail on the palm of hand.
Thumb is the head. Draw an eye and a smile on the thumb for a face.
Can draw shell marks if you choose.

U is for Umbrella. I painted the hand red (we haven't used red in a while so that is why we chose red!) Painted whole hand red, pointed fingers to the bottom of the page and stamped hand. A relaxed hand is the best. I drew a black handle on, rain drops around and down the sides, and connected the fingers with to complete the umbrella.

V is for Vehicle. I painted the whole hand. I stamped
the hand parallel to the words. I painted on a windshield and wheels.

W is for Whale. I painted the thumb and the "fat" around the thumb white. I painted the rest of the hand black. I stamped the hands with the thumbs tucked in and the fingers parallel with the words. I painted on a tail, eyes, and mouth. I drew on the waterspout with marker.

X is for X-ray. I painted the hand white. I stamped it on a square piece of black paper. I then mounted that black paper on the printed sheet.

Y is for Yak. To get this one right, it took some figuring. The student sat on my right. I used their right hand. I painted the palm of their right hand and stamped it with the fingers pointed towards the bottom of the page. I then painted the four fingers and palm of the hand. A little lower but still bumping up to the first stamp the hand again with fingers pointed to the bottom of the page. This is the side view of one fat, hairy leg. Finally, paint the whole hand including the thumb. Stamp the hand right next to the last. This is the other fat, hairy leg and the tail. I painted horns on. When try, I drew on the eyes, an oval for the nose, and two short lines for nostrils.

Z is for Zebra.
No comments:
Post a Comment